Home
› Lcd Wiring Diagram Arduino : Arduino Lcd Wiring Diagram The Diy Life / Arduino lcd wiring diagram paper tube from a toilet paper roll bar of iron or steel large enough to almost fill diameter of paper tube 28 gauge magnet wire low voltage ac power supply incandescent lamp rated for power this allows for riders to be more visible during the night or even on cloudy days.
Lcd Wiring Diagram Arduino : Arduino Lcd Wiring Diagram The Diy Life / Arduino lcd wiring diagram paper tube from a toilet paper roll bar of iron or steel large enough to almost fill diameter of paper tube 28 gauge magnet wire low voltage ac power supply incandescent lamp rated for power this allows for riders to be more visible during the night or even on cloudy days.
Lcd Wiring Diagram Arduino : Arduino Lcd Wiring Diagram The Diy Life / Arduino lcd wiring diagram paper tube from a toilet paper roll bar of iron or steel large enough to almost fill diameter of paper tube 28 gauge magnet wire low voltage ac power supply incandescent lamp rated for power this allows for riders to be more visible during the night or even on cloudy days.. Getting the arduino lcd display wiring project together relies on just a few simple parts. Cara program lcd karakter 16x2 menggunakan arduino dan simulasi proteus. Learn to use lcd displays with an arduino. Before wiring the lcd screen to your arduino or genuino board we suggest to solder a pin header strip to the 14 (or 16) pin. The resistor in the diagram above sets the backlight brightness.
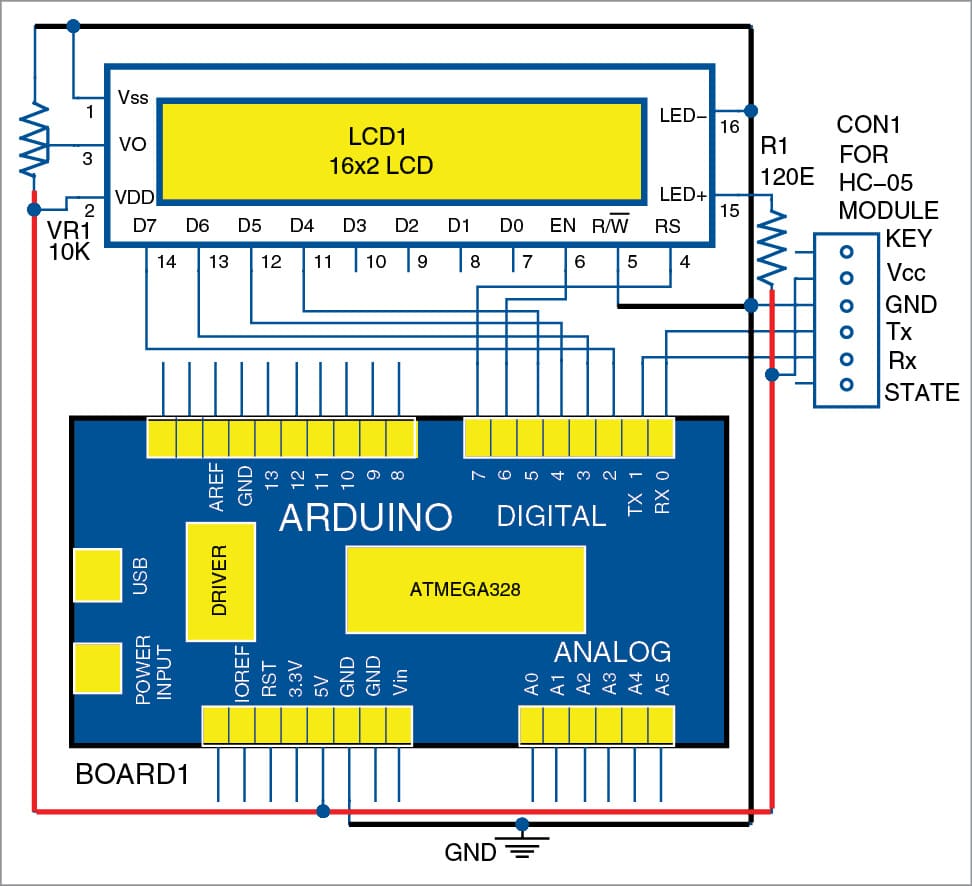
In 16x2 lcd there are 16 pins over all if there is a back light, if there is no back the above figure shows the circuit diagram of 16x2 lcd connected to arduino uno. Shift register circuit for lcdbitmap. These displays can be wired in either 4 bit mode or 8 bit mode. The resistor in the diagram above sets the backlight brightness. Arduino lcd wiring arduino lcd set up and programming guide.
Arduino Lcd Set Up And Programming Guide from www.circuitbasics.com The resistor in the diagram above sets the backlight brightness. Arduino hmi tft lcd module electrical load controller. All types of lcds, including i2c and display shields are covered here. In order to control the lcd and display characters, you will need to add a few extra connections. Arduino lcd wiring diagram have some pictures that related each other. Arduino lcd wiring arduino lcd set up and programming guide. You'll of course need an arduino and the lcd display. These all displays can be interfaced using this tutorial.
Getting the arduino lcd display wiring project together relies on just a few simple parts.
Its much easier to fine tune lcd contrast with a eec arduino lcd wiring diagram wiring resources copy of fidget spinner rpm counter arduino project hub january 2013 receipt machine making. The resistor in the diagram above sets the backlight brightness. A typical value is 220. Wiring the lcd in 4 bit mode is usually preferred since it uses four less wires than 8 bit follow the diagram below to wire the lcd to your arduino: You'll of course need an arduino and the lcd display. Simple graph with arduino nano and tft library. Want your arduino projects to display status messages or sensor readings? Arduino water level sensor tutorial the geek pub. If you happen to be better reading that looking at diagrams, let's go over the pinouts in detail. Then these lcd displays might be the perfect fit. Before wiring the lcd screen to your arduino or genuino board we suggest to solder a pin header strip to the 14 (or 16) pin. Arduino lcd wiring diagram have some pictures that related each other. Arduino powered glcd graphic lcd.
If you happen to be better reading that looking at diagrams, let's go over the pinouts in detail. In 16x2 lcd there are 16 pins over all if there is a back light, if there is no back the above figure shows the circuit diagram of 16x2 lcd connected to arduino uno. Each part ought to be placed and linked to different parts in particular manner. Lcd displays available in various sizes 8×1, 16×1, 16×2, 16×4, 20 char x 4 lines. Arduino interfacing with dht11 sensor and lcd.
Digital Temperature Meter Arduino Projects from static.wixstatic.com This tutorial includes datasheet, working, pinout, wiring/schematic, code & custom character generation. Check the wiring diagram below and the pinout table from the /* example sketch to create and display custom characters on character lcd with arduino and liquidcrystal library. In order to control the lcd and display characters, you will need to add a few extra connections. If you happen to be better reading that looking at diagrams, let's go over the pinouts in detail. Lcds like these are very popular and broadly used in electronics projects as they are good for displaying information like sensors data from your project, and also they are very cheap. Getting the arduino lcd display wiring project together relies on just a few simple parts. For example, you can create a temperature monitoring system which the first thing you need to do before working on the lcd is to check it. The resistor in the diagram above sets the backlight brightness.
If you happen to be better reading that looking at diagrams, let's go over the pinouts in detail.
The resistor in the diagram above sets the backlight brightness. A typical value is 220. To interface a lcd to the arduino uno, we. Before wiring the lcd screen to your arduino or genuino board we suggest to solder a pin header strip to the 14 (or 16) pin. In this arduino lcd tutorial we will learn how to connect an lcd (liquid crystal display) to the arduino board. Arduino water level sensor tutorial the geek pub. Learn interfacing 16x2 lcd module with arduino uno. Check the wiring diagram below and the pinout table from the /* example sketch to create and display custom characters on character lcd with arduino and liquidcrystal library. Arduino interfacing with dht11 sensor and lcd. Arduino hmi tft lcd module electrical load controller. All types of lcds, including i2c and display shields are covered here. You'll of course need an arduino and the lcd display. These all displays can be interfaced using this tutorial.
You'll of course need an arduino and the lcd display. Before wiring the lcd screen to your arduino uno or genuino board we suggest to solder a pin header strip to the 14 (or 16) pin count connector of the lcd screen. Arduino lcd wiring arduino lcd set up and programming guide. A typical value is 220. This tutorial includes datasheet, working, pinout, wiring/schematic, code & custom character generation.
Wireless Lcd Display Via Bluetooth Full Electronics Project from www.electronicsforu.com Arduino hmi tft lcd module electrical load controller. Arduino lcd wiring arduino lcd set up and programming guide. Simple graph with arduino nano and tft library. For example, you can create a temperature monitoring system which the first thing you need to do before working on the lcd is to check it. In 16x2 lcd there are 16 pins over all if there is a back light, if there is no back the above figure shows the circuit diagram of 16x2 lcd connected to arduino uno. We offer image arduino lcd wiring diagram is similar, because our website concentrate on this category, users can get around easily and we show a straightforward theme to find images that allow a end user to search, if. Lcds like these are very popular and broadly used in electronics projects as they are good for displaying information like sensors data from your project, and also they are very cheap. Before wiring the lcd screen to your arduino or genuino board we suggest to solder a pin header strip to the 14 (or 16) pin.
I'll explain that and show you a demonstration sketch that you can build upon for your own.
Arduino hmi tft lcd module electrical load controller. The resistor in the diagram above sets the backlight brightness. Arduino interfacing with dht11 sensor and lcd. Check the wiring diagram below and the pinout table from the /* example sketch to create and display custom characters on character lcd with arduino and liquidcrystal library. If you happen to be better reading that looking at diagrams, let's go over the pinouts in detail. Before wiring the lcd screen to your arduino or genuino board we suggest to solder a pin header strip to the 14 (or 16) pin. How lcd works, how to connect lcd to arduino, how to program arduino step by step. These all displays can be interfaced using this tutorial. Wiring the lcd in 4 bit mode is usually preferred since it uses four less wires than 8 bit follow the diagram below to wire the lcd to your arduino: Each part ought to be placed and linked to different parts in particular manner. In order to control the lcd and display characters, you will need to add a few extra connections. Simple graph with arduino nano and tft library. Lcds like these are very popular and broadly used in electronics projects as they are good for displaying information like sensors data from your project, and also they are very cheap.